Measuring the true mechanical properties of micron-scale intermediate layers in thin multilayer foils – without influence from the surrounding layers – is a challenge that very few instruments can meet. It takes highly responsive nanoindentation technology and very precise positioning of the indenter.
Determining the hardness and elastic characteristics on the intermediate layers of multiplex foil systems presents several challenges. A normal “top-down” style indenta-tion will yield composite properties for the entire sample, but not those of the individual layers, which requires measurements to be performed within each layer on a cross-sectioned sample. Due to the thinness of these layers, it is crucial to control the measurements precisely and to use extremely small indentations. Fortunately, nanoindentation technology, employing indents on the micron and nano scale, now allows hardness and elastic modulus measurements even on thin interior layers. Coupled with a high magnification microscope and a very precise positioning stage, nanoindentation is ideally suited for testing micron-scale components and films.
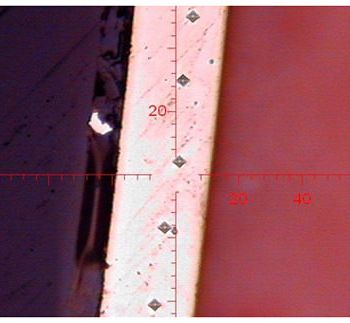
In this example, a 30 µm thick metallic foil sandwiched between a polymeric sheet and a rubberized top coat is analysed. Because the free-standing sample was not structurally rigid, to minimise sample compliance the part was mounted in epoxy and polished to a mirror finish to expose the metallic inner layer as cross-section.
The PICODENTOR® HM500 was chosen for this test due to its sensitive load resolution (≤100nN) and precise positioning capability (≤0.5µm). The values for indentation hardness (HIT), Vickers hardness (HV) and indentation modulus (EIT) were recorded for the metallic layer. The Martens hardness (HM) was measured as well and plotted as a function of indentation depth; variation in HM is an indicator of potential influence from surrounding layers. The cut edge of the metallic layer was identified under the integrated microscope (with magnification up to 1000x) and a series of indentations were made – located precisely in the centre of the 30 µm thick target layer.
With its ultra-sensitive measuring head, high-resolution microscope and precise stage, the PICODENTOR® HM500 makes it easy to accurately determine the hardness and elastic properties of micron-scale features, like cross-sectioned foils. For further details please contact your FISCHER representative.